Download the Lessonotes Mobile Liberia app for faster lesson access on Android and iPhone.
Subject: Physics
Semester: 2
Period: 6
Week: 33
School Name:
Teacher’s Name:
Subject: Physics
Grade Level: Grade 11
Week & Period: Week 33, Period VI
Date:
Topic: Reflection of Light
Sub-topic: Reflection by Plane and Spherical Mirrors
Learning Objectives:
By the end of the lesson, learners should be able to:
- State and apply the laws of reflection.
- Distinguish between regular and diffused reflection.
- Describe the formation of images in plane and curved (concave and convex) mirrors.
- Construct ray diagrams showing image formation.
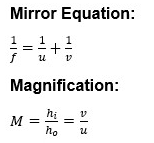
- Solve problems involving mirror equations and magnification.
Previous Knowledge:
Learners know that light travels in straight lines and can form shadows. They are familiar with everyday use of mirrors.
Instructional Materials:
- Plane mirror
- Concave and convex mirrors
- Ruler, protractor, pencil
- Ray box or torch
- White paper or cardboard
- Mirror stands
- Object pins
Anticipation (Warm-Up) – 5 minutes:
Ask:
- “Why do you see your face in the mirror?”
- “What happens when you shine a torch at a mirror at an angle?”
Use a ray box and plane mirror to show how light reflects.
Building Knowledge (Main Lesson) – 25 minutes
- Laws of Reflection:
- The incident ray, reflected ray, and normal all lie in the same plane.
- The angle of incidence equals the angle of reflection.
Diagram: Show incident ray, normal, and reflected ray at a plane surface.
- Types of Reflection:
- Regular (specular) reflection: From smooth surfaces like mirrors.
- Diffuse reflection: From rough surfaces, causing scattered rays.
- Plane Mirrors:
- Image formed is:
- Virtual
- Erect
- Laterally inverted
- Same size and distance behind the mirror
- Spherical Mirrors:
a. Concave Mirror (Converging):
- Can form real or virtual images depending on object distance.
- Applications: makeup mirrors, headlamps, solar concentrators.
b. Convex Mirror (Diverging):
- Always forms virtual, erect, and diminished images.
- Applications: car side mirrors, security mirrors.
- Ray Diagrams (Concave Mirror):
Use focal point (F) and center of curvature (C) to show:
- Object beyond C → real, inverted, diminished
- Object at C → real, inverted, same size
- Object between F and mirror → virtual, erect, magnified
Learners’ Activities:
- Perform ray-tracing with a plane mirror.
- Draw ray diagrams for concave mirrors.
- Measure object/image distances and verify mirror equation experimentally.
- Compare images formed by convex and concave mirrors.
Experiment: Verifying the Law of Reflection
Title: Measuring Angles of Incidence and Reflection
Materials: Plane mirror, white paper, protractor, ray box, ruler
Procedure:
- Draw a normal on the paper.
- Direct a ray at various angles of incidence.
- Trace and measure angles of reflection.
Observation: Angle of reflection equals angle of incidence.
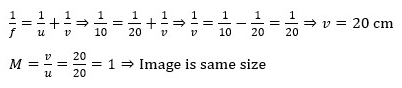
Sample Problem:
Q: An object is placed 20 cm from a concave mirror of focal length 10 cm. Find the image distance and magnification.
Solution:
Consolidation (Review and Assessment) – 10 minutes
Oral Questions:
- What are the two laws of reflection?
- What type of image does a plane mirror form?
- How does a convex mirror differ from a concave mirror?
Assignment:
- Draw ray diagrams showing how a concave mirror forms a real and virtual image.
- State two applications each of concave and convex mirrors.
Notes – Detailed and Explained
- Plane mirrors always form virtual, laterally inverted images.
- Concave mirrors can form real or virtual images based on distance.
- Convex mirrors always form virtual, erect images.
- Mirror equations help in locating image positions numerically.
- Reflection is governed by strict geometric rules.
Expanded Notes / Instructions:
- Include animations or apps for ray tracing simulations if possible.
- Bring real objects like spoons to show both concave and convex properties.
- Use practical examples like headlights and security mirrors.
Differentiation:
- Provide labeled diagrams for visual learners.
- Let kinesthetic learners build their own ray boxes using cardboard.
- Discussion and group sketching to support collaborative learners.
Teacher’s Reflection:
- Did students understand the mirror equation?
- Were they able to identify types of mirrors and uses?
- Did ray diagrams clarify image formation?