Download the Lessonotes Mobile Liberia app for faster lesson access on Android and iPhone.
Subject: Physics
Semester: 1
Period: 1
Week: 4
School Name:
Teacher’s Name:
Subject: Physics
Grade Level: Grade 12
Week & Period: Week 4, Period I
Date:
Period I
Topic: Refraction and Dispersion of Light
Sub-topic (Week 4): Lenses and Eye Defects
Learning Objectives:
By the end of the lesson, learners should be able to:
- Identify and describe the types of lenses.
- Explain how lenses form images using ray diagrams.
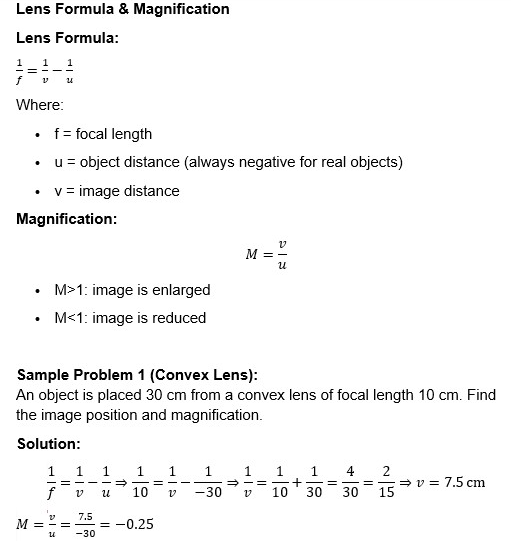
- Solve lens formula and magnification problems.
- Analyze common eye defects and their corrections.
- Discuss the practical applications of lenses in real life.
Previous Knowledge:
Learners understand refraction of light and how light bends when it enters different media.
Instructional Materials:
- Convex and concave lenses
- Ray box or light source
- Screen
- Lens holders
- Eye model chart
- Meter rule
- Graph paper
- Calculator
Anticipation (Warm-Up):
Hold a convex lens over printed text and observe the enlargement. Ask learners:
"Why does this lens make the letters look bigger? What kind of lens is this?"
Introduce the day's topic: lenses and their real-world applications (e.g., glasses, cameras).
Building Knowledge (Main Lesson):
Types of Lenses
- Convex (Converging) Lens
- Thick in the middle
- Converges light rays to a point (focus)
- Concave (Diverging) Lens
- Thin in the middle
- Spreads light rays outward
Interpretation: The image is virtual, upright, and reduced.
Ray Diagrams for Lenses
Students should draw the following:
- Convex lens with object beyond 2F – image is real, inverted, and reduced
- Object at 2F – image is real, inverted, same size
- Object between F and lens – image is virtual, upright, and magnified
- Concave lens – image is always virtual, upright, and reduced
Eye Defects and Correction
|
Defect |
Description |
Correction |
|
Myopia |
Nearsightedness (can’t see far) |
Concave lens |
|
Hypermetropia |
Farsightedness (can’t see near) |
Convex lens |
|
Astigmatism |
Uneven focus due to lens shape |
Cylindrical lens |
|
Presbyopia |
Aging-related near vision loss |
Bifocal lens |
Experiment: Image Formation by Convex Lens
Materials:
- Convex lens
- Light source
- Screen
- Meter rule
Procedure:
- Place object (e.g., lit candle) at various distances from lens.
- Adjust screen to catch the sharp image.
- Measure distances uuu and vvv.
- Use lens formula to verify results.
Observation: Image changes size and position depending on object distance.
Learners’ Activities:
- Draw ray diagrams for different lens-object positions
- Solve lens formula problems
- Identify eye defects in diagram and match to corrections
- Conduct lens experiment and record data
Assessment
Classwork:
- A convex lens has a focal length of 15 cm. Find the image distance and magnification when the object is 20 cm from the lens.
- What kind of image is formed when an object is placed between the focus and a convex lens?
- Match the following eye defects with their corrections:
Myopia – ?
b. Hypermetropia – ?
Homework:
- Use diagrams to explain how a concave lens corrects myopia.
- State three differences between convex and concave lenses.
- Solve: An object is 10 cm in front of a concave lens of focal length 15 cm. Find image distance and magnification.
Expanded Notes:
- Lenses are used in projectors, glasses, microscopes, and cameras
- Eye defects can be corrected with proper lens prescriptions
- Image properties depend on object position relative to the focal point
- Concave lenses always form virtual images
Differentiation (Support & Challenge):
- Use ray tracing templates for visual learners
- Provide step-by-step calculation guides
- Let advanced learners derive the lens formula from first principles
- Create eye defect simulation with cardboard cutouts
Teacher’s Reflection:
- Were students able to relate ray diagrams to real-life examples?
- Did learners solve the lens formula problems independently?
- Was the experiment well executed and understood?